| << Objects | Clipart on the WWW >> |
| Top: Documentation Library | Up: Objects |
Creating Your Own Borders
by Deron Kazmaier
Through the years people have asked if they can create borders for themselves. I've always been reluctant to tell them how, not because I care if they know how, but because it is a difficult process to explain. Hopefully my attempt here will be intelligible! In this issue we will cover the basics, and next issue cover a few more complex examples.
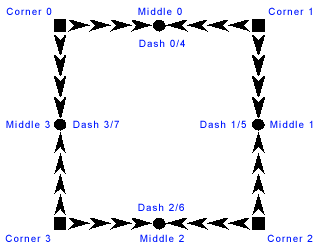
As you may or may not know, PageStream's ''Border'' tool uses small vector paths that are scaled and/or repeated to fill the available space and still remain smooth. Each border can consist of a number of paths for each of the basic elements or reuse the same path for each of the basic elements. A border can independently define a path to use for each of the 4 corners, each of the 4 middles, and 8 different dashes or edges border elements.
The best way to learn is to create your own. So let's do so now! When the ''Border'' tool is initialized, it will load each and every border package installed in the SoftLogik/Engines/Borders folder and creates a single list of borders. When you execute the SAVEBORDERS command, it will save all the borders into a single default package. First thing you need to do is remove all the existing border packages from PageStream's installation. Go to the SoftLogik/Engines/Borders folder and move everything inside that folder into a new folder called "Uninstalled". These borders will not be loaded when you start PageStream and therefor will not be saved into your new borders package. This makes sharing your borders easier, and allows package authors to update previous packages without destroying others.
Once you have done that, start up PageStream. The first border we are going to create is going to be called Simple Boxes. To create a new border you must issue a PageStream command. For those of you using an Amiga, you can fire up the PageStream CLI and enter these commands there. Otherwise, you will need to open the ''Script Palette'' and create a new script called "a" or some other name that will get sorted to the top. It is just a temporary script that you will have to make numerous edits of and execute after to tell the border extension what it is you want it to do. When you need to execute a command, you can shift-click on the name in the ''Script Palette'', edit the contents to the new command to execute, choose ''OK'', and then double click on the script to run it and therefor execute the command.
That all said, create a new document. Execute the command EXTENSION ADDBORDER "Simple Boxes". Then with PageStream's ''Box'' tool draw a box that is 1in wide and 1in tall with the upper left corner of the box at the upper left corner of the page. For those of you using metric, you can use any dimension you want, just keep the proportions the same. So 1cm x 1cm would be just fine. Now select the object with the ''Object'' tool. Now execute the command EXTENSION ADDBORDERPATH "Simple Boxes" 0 1.5in 1.5in. Again, for those of you using metric, you can use EXTENSION ADDBORDERPATH "Simple Boxes" 0 1.5cm 1.5cm. The first number is the path id that will be used later to reference this path and is specific to this border only. Once the path has been added to the border, you can delete the path (or box in this case) or do as I do and keep all the paths for a border on a single page in case you ever need to go back and rebuild a border.
The second two numbers are the size of the path relative to the path size itself. In other words, you are telling the ''Border'' tool that you want an equal amount of space all around the box. The size is only one half bigger than the object because the dash pieces will contribute one half the spacing. If you wanted the space between the elements to be one half the size of the box, you would use 1.25 instead of 1.5.
Each corner will display a copy of this box, and you can set that by executing the command EXTENSION SETBORDER "Simple Boxes" CORNER ALL 0 DONTFLIP DONTSCALE.
Now we need to create the middle and dash elements. It will be the same box, but needs to be shifted to the left by .5in first. This is because these elements are assumed to be drawn centered to the origin unlike the corners. Now execute the command EXTENSION ADDBORDERPATH "Simple Boxes" 1 2.0in 1.0in.
We don't need to set a middle path if we just want a best fit of boxes from corner to corner. If you want the middle of the border edge to always have a box centered, you would execute the command EXTENSION SETBORDER "Simple Boxes" MIDDLE ALL 1 DONTFLIP DONTSCALE.
Last but not least we need to fill the gap between the corners, or corners and middles. In this design we do not want the boxes to expand (and distort) to fill available space, but just be filled as tightly as possible and then any extra space evenly divided between the paths. Executing the command EXTENSION SETBORDER "Simple Boxes" DASH ALL 1 DONTFLIP MANY DONTSCALE will do just that.

All the paths of a border need to be proportionally designed to the same border width, but are scaled to the default width which can be overridden by the user to create thinner or thicker borders as desired. In our case here, the border thickness was designed around a 1in (or 1cm) box. So we need to set for this border that the design thickness is 1in (or 1cm). Execute the command EXTENSION SETBORDER "Simple Boxes" DESIGNSIZE 1in (or 1cm). Now all we need to decide is the default border thickness. One inch
or even one cm is probably too thick for a default. Instead we might try .2in or as you desire. To set the default size, execute the command EXTENSION SETBORDER "Simple Boxes" DEFAULTSIZE .2in.
Last but not least, we need to save our border. Executing the command EXTENSION SAVEBORDERS will save out all the loaded borders into the default borders package in the SoftLogik/Engines folder under the file name Borders.library. After doing so, go ahead and play around with the border, and try out a few of the options available to you. Below is a short list of all the border commands for building borders. I'll try and explain the additional options and cover a couple complex borders in the next installment of this article. In the mean time, enjoy! If you have created a border or two that you would like to share, post them to the files section in the PageStreamSupport mailing list. Fame will surely follow.
SAVEBORDERS
ADDBORDER bordername
DUPLICATEBORDER bordername dupbordername
ADDBORDERPATH bordername id width height
SETBORDER bordername [CORNER <0-3|ALL>
<UNUSED|<[id][FLIP|DONTFLIP][SCALE|DONTSCALE]>>
MIDDLE <0-3|ALL> <UNUSED|<[id][FLIP|DONTFLIP][DONTSCALE]>>
DASH <0-7|ALL>
<UNUSED|<[id][FLIP|DONTFLIP][MANY|JUSTONE][SCALE|DONTSCALE]>>
CORNER2 <0-3|ALL> <UNUSED|<[id][FLIP|DONTFLIP]>>
MIDDLE2 <0-3|ALL> <UNUSED|<[id][FLIP|DONTFLIP]>>
DASH2 <0-7|ALL> <UNUSED|<[id][FLIP|DONTFLIP]>>
DESIGNSIZE coord
DEFAULTSIZE coord
NAME name]
SETBORDERPATH bordername id [WIDTH width] [HEIGHT height] [PATHWIDTH width]
[PATHHEIGHT height]
DELETEBORDER bordername
DELETEBORDERPATH bordername id
(The following needs to be merged into the above to create a single article, and perhaps broken into sections by concept?)
Design Your Own Borders #2 and Corrections to #1
By Deron Kazmaier
Hi! For those of you have been curious enough to design your own borders using the instructions given last time, you will probably have noticed a problem with alignment of some of the parts. The instructions for the first ADDBORDERPATH had an error. Instead of the size listed as 1.5in 1in, it should have been 1.5in 1.5in. Adding the corners should leave room to the right _and_ below for the dashes if you so desire spacing there. The article online in the eDTP World section of our website has been updated and corrected, and includes the missing screen shots as well. The following is a tutorial on creating two more borders that builds on the first lesson. I suggest you go take a look at the first article in eDTP World issue #4 before proceeding here. For screen shots, take a look at our web site in the online version of eDTP World issue #6.
Let's get to it! Starting PageStream with no installed borders using the instructions from before, create a new document. Now draw a simple 1in by 1in box in the upper left corner of the page (edit palette dimensions would be x:0in y:0in w:1in h:1in) and another smaller box inside it (edit palette dimensions would be x:.5in y:.5in w:.25in h:.25in). Select both boxes with the ''object'' tool, and choose merge paths.
Then execute the commands:
EXTENSION ADDBORDER "Corners"
EXTENSION ADDBORDERPATH "Corners" 0 1in 1in
Which will create the border named “Corners” and add the double box path to be used as the corner of the border.
Now draw a rectangle that is 1 inch wide and .25 inch tall just .5 inch down from the top of the page and centered around the left edge (edit palette dimensions would be x:-.5in y:.5in w:1in h:.25in).
With the ''Object'' tool selected, execute the command EXTENSION ADDBORDERPATH "Corners" 1 1in 1in. This will add the new rectangle as path 1 to be used as the dash.
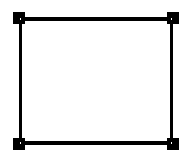
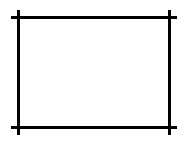
EXTENSION SETBORDER "Corners" CORNER ALL 0 FLIP DONTSCALE will set all four corners of the border to path 0, and will flip the corner path as appropriate for the corners and will not stretch the corner path to fill available space. EXTENSION SETBORDER "Corners" DASH ALL 1 FLIP JUSTONE SCALE will set all four sides to path1 and flip the path around as appropriate for the sides, will place just one copy on each side, and will scale the elements to fit the space. As the size of the two paths is set to the actual size of the paths, no space will be left between the parts and create a continue line. Finishing the border with:
EXTENSION SETBORDER "Corners" DESIGNSIZE 1in
EXTENSION SETBORDER "Corners" DEFAULTSIZE .2in
EXTENSION SAVEBORDERS
The end result looks like this:
With the same second path from above (the rectangle at x:-.5in y:.5in w:1in h:.25in), execute the following which will create a similar border but without corners:
EXTENSION ADDBORDER "Crosspaths"
EXTENSION ADDBORDERPATH "Crosspaths" 1 1in 1in
EXTENSION SETBORDER "Crosspaths" DASH ALL 1 FLIP JUSTONE SCALE
EXTENSION SETBORDER "Crosspaths" DESIGNSIZE 1in
EXTENSION SETBORDER "Crosspaths" DEFAULTSIZE .2in
EXTENSION SAVEBORDERS
You can see the interesting border will look like:
Enjoy!
Creating Your Own Borders Section url:PGSguide/creatingborders
created:2006-06-19 15:03:07 last updated:2006-08-16 16:37:46
Copyright © 1985-2026 GrasshopperLLC. All Rights Reserved.
| User Contributed Comments For Creating Your Own Borders | sign in to add a comment |
| Tim Doty wrote... | 2007-05-12 06:39:32 |
Some thoughts on creating borders: make sure your paths are not rotated or otherwise transformed before adding to a border. Failure to do so will cause unpredictable results. To "unrotate" a path while keeping the same orientation use Object->Path->Split followed by Object->Path->Merge Rotations and transforms are not lossless due to the use of standard libraries. (1) Ironically due to the high layout precision used by PageStream these small errors are preserved (2) and can multiply with multiple transforms. The errors are usually very small but they can cause slight mismatches which are particularly noticeable by causing non-smooth joins in curves where they meet between pieces. The solution is to pre-rotate and correct paths for each side of the border. It is not always clear what value to use for the design size. In many borders this will be the width of a dash piece (not its length). Using SCALE
If the border pieces are not all the same width take care to align them relative to the intended design width and specify the correct bounding box when adding the path, not necessarily the paths actual size. When using curves the control points for exterior nodes may end up outside of the visual and desired path. PageStream considers the boundary of a path to be the extreme points whether they are nodes or control points. Don't be fooled by the reported dimensions of the path in such cases. If this happens visually identify the outermost nodes, select each one to get its coordinates from the edit palette and calculate the real size of the path. Be careful when using SCALE for elements. When scaling elements PageStream considers the top elements as a unit and the bottom elements as a unit. The amount of X-scaling for the side elements is determined by the scaling of the top corners. If this is different than the bottom corners there will be a mismatch. If this happens set the corners to DONTSCALE. Check your borders by sizing them from small to large both in border width and the size of the border object. See how it behaves when there is no room for dashes. When it is smaller than the size of the elements. PageStream does its best to draw the border using the specified parameters but the results aren't always good -- but within limits these artifacts can be controlled by defining the border carefully. 1. The fault lies in the input for rotation being in degrees which are then converted internally to radians, 90 degrees is equal to pi/2 radians for which there is no exact solution. In consequence even when using 90 degree rotations there will be some imprecision. 2. If PageStream only tracked coordinates to 0.01 inches then most errors would be lost in rounding to the nearest hundredth of an inch. This is a relatively minor issue compared to the benefits of having a very precise layout engine. | |
| Tim Doty wrote... | 2007-05-13 18:20:24 |
 Situation SituationTo create a border that only has left and right or top and bottom sides -- sometimes PageStream makes the defined sides stretch to meet in the middle if there aren't any paths/border elements designed for the omitted sides. Not a good situation, but what can you do about it? Use a "null" path. SolutionWhat is a "null" path and how do you create one? NotesWhy do you need the "ADDPOINT" command? | |
| Tim Doty wrote... | 2007-10-04 22:30:48 |
The ProblemPageStream doesn't like objects that aren't on the page and borders are no exception. If you're trying to make a fancy border that results in a path being completely off the page to align it correctly for the border then PgS won't add the path. What to do?
Run that by me again?
| |
| User Contributed Comments For Creating Your Own Borders | sign in to add a comment |
| << Objects | Clipart on the WWW >> |
| Top: Documentation Library | Up: Objects |