| << Line, Fill & Color | Printing >> |
| Top: Documentation Library | Up: Line, Fill & Color |
Using Blends and Transparencies
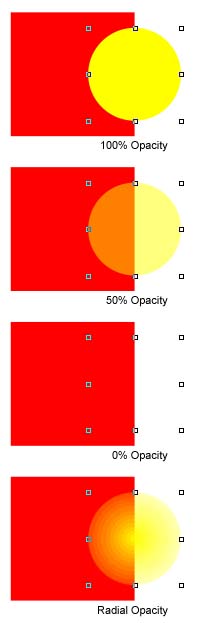
Fill blending or transparency are terms commonly used to communicate the concept of blending objects with the objects beneath them. These blends can act much like the finger paints we played with as a child. A red box partially overlapping a yellow circle will display and print as orange where the two shapes overlap.

Before now, many eye-caching graphic over graphic design elements using blends had to be precomposed in an image editing program like PhotoShop or GIMP. Unfortunately, the ability to make changes to these precomposed items is much more difficult and they have to be very high resolution pictures to eliminate the stair step effects in text and lines. With the release of PageStream5, most of these designs can now be done right within the program.
In PageStream5 you can now select more than just the color of a fill, the pattern of a fill, or even two colors and how to blend between those two colors in the region to be filled. Now you can also choose between normal "opaque" fill where the region to be filled complete obscures the background of objects below it in the stack, and a blend where the fill is mixed with those below it in the stack. This blend is controlled by an opacity value where 100% implies that all of the selected fill color is applied and none of the background is used. 50% would be a equal mix of background and foreground, and of course 0% would be an invisible fill using none of the selected fill and showing all of the background. When filling with a gradient or radial blend of two colors, the opacity can be set independently for the two colors. A radial fill with 0% opacity for the outside color and 100% for the inside will appear to fade into the background.
So what can you do with this? Probably the most common usage seen is where text shadows actually blend with the background to create a more natural shadow. To do this in PageStream, type text into a frameless text object and select the text with the ''Text'' tool. With the shift key held down, choose ''Shadow'' from the ''Type Style'' submenu in the ''Type'' menu or shift-click on the ''S'' button in the ''Edit Palette''. The ''Define Shadow'' dialog box should appear. Select ''Custom Shadow'' from the ''Type'' popup. Select the ''Set Line and Fill Style'' button. The ''Line & Fill'' dialog box will appear. Select the ''Fill'' panel from the top row of tabs. Select the color Black with a tint of 100%. Select ''Opacity'' from the ''Blend'' popup with a opacity of 30%. Select ''OK'' to accept the changes to the fill, and then select ''OK'' to accept the custom shadow. With the ''Object'' tool you can now move the text around and see how it interacts with the background.

Another application is to lighten or darken a region of a picture to make text over it stand out. For dark text on a lightened background, first draw a box over the area of the picture that the text will appear. Then using the ''Line & Fill'' dialog box turn the stroke off and set the fill to White with an opacity of 60%. Now type the text into a frameless text object on top of this box. Another method is to create a text frame and set the fill as above and set the text margins in the ''Text Frame Options'' dialog box from the ''Text Frame'' submenu in the ''Object'' menu. To use white text on a darkened background, just set the fill to ''Black'' instead of ''White''.

PageStream5 Professional takes this one step further and allows a blend to be assigned to a layer / drawing, EPS or picture mask. To see this in action, import a picture and place it on a page. With the ''Ellipse'' tool, draw an ellipse over the picture that will hilite the main subject matter of the picture. Select both the picture and the ellipse with the ''Object'' tool and choose ''Mask Graphic'' from the ''Mask'' submenu in the ''Object'' menu. The picture should now be cropped to the shape of the ellipse. With the newly masked picture selected, choose ''Mask Options'' from the ''Mask'' submenu in the ''Object'' menu. Choose ''Radial'' from the ''Blend'' popup, with an inside opacity of 100% and an outside opacity of 0% and select ''OK'' to accept the changes.The edges of the picture will now fade into the background.

One last trick with text. Create a text frame or frameless text and fill it with several lines of text. With the ''Object'' tool, select the text and choose ''Make Drawing'' from the ''Drawing'' submenu in the ''Object'' menu. Now choose ''Mask Options'' and set a gradient blend, with a start opacity of 80% and an end opacity of 30% and an angle of 90 degrees.
Using Blends and Transparencies Section url:PGSguide/blends
created:2006-06-18 19:55:47 last updated:2006-08-16 16:43:12
Copyright © 1985-2026 GrasshopperLLC. All Rights Reserved.
| User Contributed Comments For Using Blends and Transparencies | sign in to add a comment |
| There are no user contributed comments for this page. | |
| << Line, Fill & Color | Printing >> |
| Top: Documentation Library | Up: Line, Fill & Color |