| << Autotracing a Picture | Trace Tips >> |
| Top: Documentation Library | Up: Autotracing a Picture |
To Autotrace a Picture

1. Select what to trace.
Select an area to autotrace, or deselect a selected area if you want to trace the entire picture.
2. Choose the ''Trace'' command from the ''Effects'' menu.
The ''Trace'' dialog box will open.
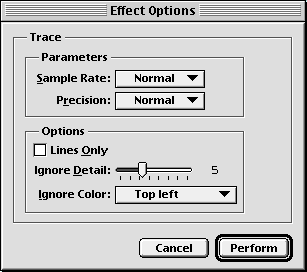
3. Set the sample rate.
The ''Sample Rate'' setting determines how many pixels to use for tracing. It is not necessary to use every point because it slows down tracing and creates an excessively complex drawing. The ''Normal'' setting produces acceptable results for most pictures. Use ''Fine'' for pictures that use very few pixels to show a curve, and ''Coarse'' for high resolution pictures.
4. Set the precision.
The ''Precision'' setting determines how much time is spent generating curves. The ''Tight'' setting takes less time but generates many short curves, while the ''Loose'' setting takes more time and generates fewer but longer curves, which may not match the picture as closely. The ''Normal'' setting produces acceptable results for most pictures.
5. Set the other trace options.
The ''Lines Only'' option creates line segments only instead of lines and curves. Use this to reduce the complexity of drawings traced from pictures that do not require curves.
The ''Ignore Derail'' option is useful for skipping parts of a drawing which should not be traced. This function uses a different algorithm than the ''Reduce Noise'' filter, and can eliminate isolated hash marks in scanned sketches and other small objects. The ''Ignore Derail'' option has no effect on pictures that do not have small isolated objects. Use a setting of 0 to trace everything in picture, and a setting of 15 to ignore large amounts of derail. The default value of 5 is suitable for most pictures.
The ''Ignore Color'' option allows you to choose one color to not trace. This is useful if the picture's subject is placed on a color background that you do not wish to trace. The background color for most pictures is usually the same color as the top left pixel, so the default setting should normally be used. You can change this to the lightest, darkest or most common color if required. Use the ''None'' option only when you want to trace the background with the subject matter, or if there is not a background color because all colors are integral to the picture.
6. Click ''Perform''.
A progress meter will appear to show the progress of the trace feature. The length of time required to trace a picture depends on the size and complexity of the picture.
7. Enter the filename.
When the trace progress is complete, a file selector will open to enter the filename and path of the drawing to save. Enter a name and click on ''Save''.
 | Tracing a picture in BME creates an IFF DR2D drawing. While this drawing format can be loaded in PageStream, it may not be compatible with other programs. If you need to convert the drawing to another format, such as Adobe Illustrator, load it into PageStream and export it in a different format with the ''Export Graphic'' command in the ''File'' menu. |
To Autotrace a Picture Section url:BMEuser/autotracing#howto
created:2006-04-22 11:39:00 last updated:2006-08-18 17:45:46
Copyright © 1985-2026 GrasshopperLLC. All Rights Reserved.
| User Contributed Comments For To Autotrace a Picture | sign in to add a comment |
| There are no user contributed comments for this page. | |
| << Autotracing a Picture | Trace Tips >> |
| Top: Documentation Library | Up: Autotracing a Picture |